To remove an email address from many users is a time consuming task. This PowerShell command will automate the process.
$mailbox = Get-Mailbox mail.alias ; $mailbox.EmailAddresses -="email.alias@mydomain.com" ; $mailbox set-mailbox
Friday, December 19, 2008

Friday, September 19, 2008
Store.exe using excessive memory
There are many reasons why store.exe would use lots of memory. The strangest one i have found recently was failed backups.
After performing a backup of the mailbox databases the memory utilisation of store.exe dropped from 15.6Gb to 2.9Gb.
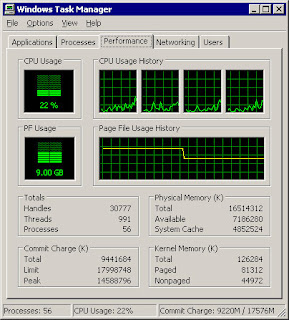
The drop in the above screen capture was 1 of 3 drops that occurred during the backup process. So if your store.exe is using heaps of memory and you cannot explain it. Check when your last backup was successful.
Thursday, July 24, 2008
Unified Messaging Language Packs
If you are from South Africa or the UK, you'd probably say "what the hell is the pound key?" when the auto assistant on Exchange 2007 asks you to press it.
The default installation of the Unified Messaging role installs the US English Language Pack. If you would like to speak to the auto assistant's sexy and sultry british alter-ego, you need to install the British English Language Pack. She will then prompt you to press the "Hash" key.
To make a date with this British beauty you will need the Exchange 2007 Server media or installation files. The language pack can only be installed from the command prompt.
Exsetup /AddUmLanguagePack:en-GB /sourcedir:d:\Downloads\UmLanguagePacks
Once this has installed the pack, simple open exchange management console. Expand Organization Configuration and then Unified Messaging. Right-Click the UM Dial Plan you would like to change the language for, and select properties. Select the Settings Tab and change the language pack from English(United States) to English(British)
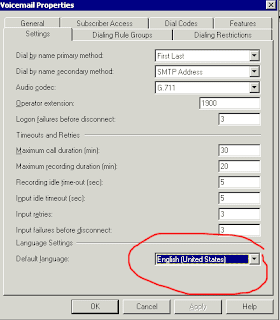
That's it, instant results.
Monday, June 9, 2008
Anonymous relay
To enable anonymous relay on exchange 2007 you need to create a new connector, assign an inbound range of ip addresses to it and then enable relay to the anonymous account.
1) Create the connector
In exchange management console. expand Server Configuration, click Hub Transport. On the right, select the hub transport server that will relay. In the Action pain, click "New Receive Connector". Give it a name, something intuitive preferable. "Anonymous Relay" is good one :) Click Next.
You can leave the next screen alone, unless you plan to use a different IP address for this relay.
Next you need to specify what IP addresses will be allowed to relay through this connector.
Select the default range listed and click Edit. If you are using a single IP address, enter the same address in the start address and end address.
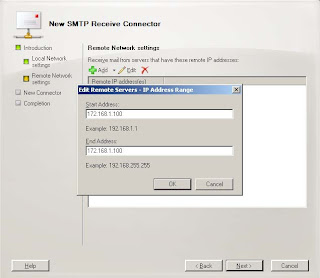 Click OK and then Next. Click New and then Finish to complete this process.
2) The next step actually enables the anonymous relay.
Right-click the new receieve connector, and select properties. One the Authentication Tab remove all the existing ticks and place a tick in the "Externally Secured (for example IPsec)" box. On the Permission group Tab, select Anonymous and Exchange Servers only. Click OK.
Close the exchange management console and open the exchange management shell.
type in the following :
Get-ReceiveConnector "Receive Connector Name" | Add-ADPermission -User "NT AUTHORITY\ANONYMOUS LOGON" -ExtendedRights "Ms-Exch-SMTP-Accept-Any-Recipient"
That's it. The ip addresses you specified in the receive connector will be able to relay to any domain.
1) Create the connector
In exchange management console. expand Server Configuration, click Hub Transport. On the right, select the hub transport server that will relay. In the Action pain, click "New Receive Connector". Give it a name, something intuitive preferable. "Anonymous Relay" is good one :) Click Next.
You can leave the next screen alone, unless you plan to use a different IP address for this relay.
Next you need to specify what IP addresses will be allowed to relay through this connector.
Select the default range listed and click Edit. If you are using a single IP address, enter the same address in the start address and end address.
 Click OK and then Next. Click New and then Finish to complete this process.
2) The next step actually enables the anonymous relay.
Right-click the new receieve connector, and select properties. One the Authentication Tab remove all the existing ticks and place a tick in the "Externally Secured (for example IPsec)" box. On the Permission group Tab, select Anonymous and Exchange Servers only. Click OK.
Close the exchange management console and open the exchange management shell.
type in the following :
Get-ReceiveConnector "Receive Connector Name" | Add-ADPermission -User "NT AUTHORITY\ANONYMOUS LOGON" -ExtendedRights "Ms-Exch-SMTP-Accept-Any-Recipient"
That's it. The ip addresses you specified in the receive connector will be able to relay to any domain.
Saturday, May 17, 2008
Exchange 2003 and 2007 cannot exchange mail
If you have created the routing group connector using the Management Shell and you are still unable to route mail between exchange 2003 and exchange 2007, you may find the permission inheritance on the exchange 2003 servers has been disabled.
To correct this, you will first of all need to enable the security tab in exchange 2003 system manager.
http://support.microsoft.com/default.aspx/kb/264733
1. Start Registry Editor (Regedt32.exe).
2. Locate the following key in the registry:
HKEY_CURRENT_USER\Software\Microsoft\Exchange\EXAdmin
3. On the Edit menu, click Add Value, and then add the following registry value:
Value Name: ShowSecurityPageData Type: REG_DWORDRadix: BinaryValue: 1
Once this is done, open Exchange System Manager, navigate to each server in turn and edit the properties. On the security tab, click advanced. Tick the "Allow inheritable permission from the parent ... " check box. Click OK twice.
Incidently, if you run the Best Practices Analyser that come with exchange 2007, and choose the 2007 readiness check, it will report this as a problem area if permission inheritance is not enabled.
To correct this, you will first of all need to enable the security tab in exchange 2003 system manager.
http://support.microsoft.com/default.aspx/kb/264733
1. Start Registry Editor (Regedt32.exe).
2. Locate the following key in the registry:
HKEY_CURRENT_USER\Software\Microsoft\Exchange\EXAdmin
3. On the Edit menu, click Add Value, and then add the following registry value:
Value Name: ShowSecurityPageData Type: REG_DWORDRadix: BinaryValue: 1
Once this is done, open Exchange System Manager, navigate to each server in turn and edit the properties. On the security tab, click advanced. Tick the "Allow inheritable permission from the parent ... " check box. Click OK twice.
Incidently, if you run the Best Practices Analyser that come with exchange 2007, and choose the 2007 readiness check, it will report this as a problem area if permission inheritance is not enabled.
Tuesday, April 29, 2008
Mail delivery limits and settings
Mail delivery settings in Exchange 2007 are not as easy to find as in Exchange 2003.
The first settings we will look at, is the Size settings for inbound and outbound smtp traffic.
To see what your current configuration is, open Exchange Management Shell, and type
Get-TransportConfig or (get-tran tab tab tab)* (* tab is auto-complete in powershell)
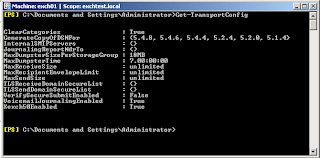 These are the default settings. To configure Maximum outgoing message size, we use the -MaxSendSize switch. Microsoft has been kind enough to allow us to specify the units we are working with, ie: kb, mb, gb or tb. Kilobytes is assumed if no unit is specified. So we could change the outbound message size to a 10Mb limit by typing: Set-TransportConfig -MaxSendSize 10mb
We could then also specify maximum receiveable size at 10mb too.
Set-TransportConfig -MaxReceiveSize 10mb
now, if we Get-TransportConfig
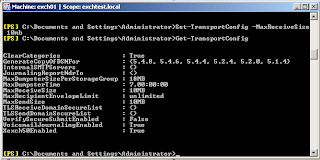
Incidently, you can override these settings on a per-mailbox basis.
Get-MailboxSelect-Object MaxSendSize, MaxReceiveSize
will return the current setting. If you wish to change it use:
Set-Mailbox-MaxSendSize 5mb -MaxReceiveSize 5mb
Many companies use external mail filtering solutions. This means that all inbound and outbound mail is passed through a smart host for processing and delivery. Exchange 2007 does not assume this to be the case straight off. In Exchange Management Console, We need to make a change to the maximum outbound connections per domain. To make this change, expand Server Configuration on the left, select the Hub Transport Server that is reponsible for delivering to the smart host. Click Properties in the Action Pain on the Right. Navigate to the limits tab.
At the bottom, there is the setting. Change the maximum outbound connections per domain to 1000. This will ensure Exchange is able to open as many threads to the smart host as possible.
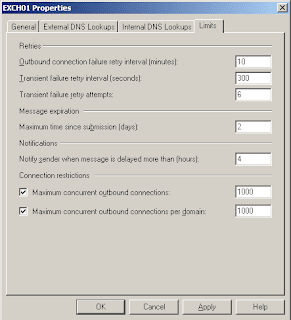
Limits all set, your mail should be flying in and out.
The first settings we will look at, is the Size settings for inbound and outbound smtp traffic.
To see what your current configuration is, open Exchange Management Shell, and type
Get-TransportConfig or (get-tran tab tab tab
 These are the default settings. To configure Maximum outgoing message size, we use the -MaxSendSize switch. Microsoft has been kind enough to allow us to specify the units we are working with, ie: kb, mb, gb or tb. Kilobytes is assumed if no unit is specified. So we could change the outbound message size to a 10Mb limit by typing: Set-TransportConfig -MaxSendSize 10mb
We could then also specify maximum receiveable size at 10mb too.
Set-TransportConfig -MaxReceiveSize 10mb
now, if we Get-TransportConfig

Incidently, you can override these settings on a per-mailbox basis.
Get-Mailbox
Set-Mailbox
Many companies use external mail filtering solutions. This means that all inbound and outbound mail is passed through a smart host for processing and delivery. Exchange 2007 does not assume this to be the case straight off. In Exchange Management Console, We need to make a change to the maximum outbound connections per domain. To make this change, expand Server Configuration on the left, select the Hub Transport Server that is reponsible for delivering to the smart host. Click Properties in the Action Pain on the Right. Navigate to the limits tab.
At the bottom, there is the setting. Change the maximum outbound connections per domain to 1000. This will ensure Exchange is able to open as many threads to the smart host as possible.

Limits all set, your mail should be flying in and out.
Friday, April 25, 2008
RPC over https Part 2
Configuring exchange.
The next step is to configure exchange virtual directories. This assumes that you are running all the roles on one server. So you've installed Client Access, Hub Transport and Mailbox Role to a single server.
Start by opening Exchange management shell.
The next step is to configure exchange virtual directories. This assumes that you are running all the roles on one server. So you've installed Client Access, Hub Transport and Mailbox Role to a single server.
Start by opening Exchange management shell.

Now we get started with some almost difficult command-line stuff. If you started out with ms-dos you should feel quite at home. First we need to set the web services virtual directory internal and external url's. Type Get-WebServicesVirtualDirectory and press enter.
(tip: if you type get-web and press Tab, it will auto-complete for you.)
Click the top-left corner of the shell box, hover your mouse over edit and click mark. Create a block by selecting all the text and then press enter. Open notepad and paste the text.
Edit the Internalurl to reflect the common name you registered in the certificate. Select this url and click edit and then copy.
Go back to the shell. type:
Set-ClientAccessServer -AutoDiscoverInternalUri 'https://thenameonyourcert/autodiscover/autodiscover.xml'
Set-WebServicesVirtualDirectory -InternalUrl 'https://thenameonyourcert/EWS/Exchange.asmx' -Identity 'servername\EWS (Default Web Site)'
Next we set the Outlook Address Book internal url:
Set-OabVirtualDirectory -InternalUrl 'http://thenameonyourcert/OAB'
Next we set the Outlook Web Access internal url:
Set-OabVirtualDirectory -InternalUrl 'http://thenameonyourcert/OAB'
and finally we set the autodiscover url:
Set-AutodiscoverVirtualDirectory -InternalUrl https://thenameonyourcert/Autodiscover/Autodiscover.xml -Identity 'servername\Autodiscover (Default Web Site)'
Ok, certificates all done. Now open Exchange Management Console. and enable Outlook anywhere. You will be prompted for the external address. You need to specify the name on your certificate.
Once successfully installed. Your Outlook Anywhere or RPC over HTTPS is configured and ready to use.
Subscribe to:
Posts (Atom)

 Posts
Posts

