Outlook Web Access and Outlook Anywhere configuration in Exchange 2007 is an interesting procedure. Here are the steps to configure them using an internal root certificate authority.
First install a Stand-Alone root certificate authority, that is, if you don't already have one in your organisation.
Go to Add/Remove Programs in Control Panel. Select "Add/Remove Windows Components".
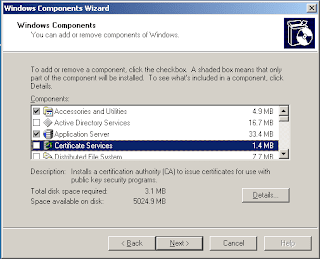
Select Certificate Services, and click Details. Click in the Select box for Certificate Services CA, you will be shown a dialog box warning that you will not be able to change the name of the server once you install the certificate services. Click Yes and then OK. Click Next. Choose Stand-Alone Root CA and click next. Enter the name of your CA. You can call it whatever you like really. Click Next. Verify the path of the certificate database and log and click next.
You will get a dialog box warning that IIS will be stopped temporarily. Click Yes. Windows will then copy some files, so make sure you have you Windows Server 2003 Disk 1. You may be warned that ASP needs to be enabled on IIS, choose Yes. Click Finish when it's all done.
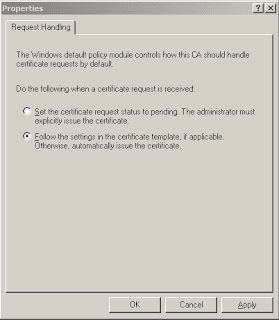
Next we can get CA Services to automatically issue the certificates on request. In administrative tools, Select Certificate Authority. Right-click "Certificate authority (local)" and click properties. On the Policy Module tab select Properties and choose "follow the settings in the certificate template, if applicable. Otherwise, automatically issue the certificate." and click ok. The certificate services will restart. Close the Certificate Authority.
Ok, CA installed. NExt step is to request a certificate.
Open Internet Information Services Manager from Administrative Tools. Expand your server name and websites. Right-click "Default Web Site" and click properties. On the Directory Security tab, click Server Certificate.
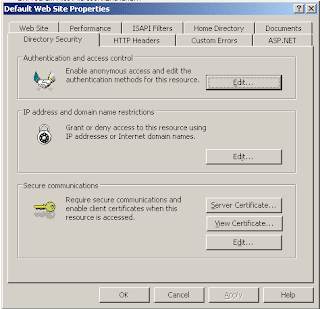
Click Next, select Remove the Current certificate and click next twice and then finish. Click Server Certificate again. Click next. Choose Create a new certificate and click next. Choose Prepare the request now, but send later. Click Next. Accept the Default name and bit length and click next. Enter you organisation information and click next. Now the next step is very very important. Here you enter the common name. This is the name you will enter into your browser to connect to you outlook web access. This name should be a public name. I'm using webmail.rndorg.net - If you get this wrong, your certificate will be useless and you will have to start again. So enter the name and click next. Choose your country, state/province and city/locality and click next. Accept the default name and path and click next twice and then finish.
Now we need to submit the request to the Root CA. To do this we go into internet explorer. and navigate to http://caservername/certsrv
Click Request a certificate. and then advanced certificate request. Choose the second option, "Submit a certificate request by using .... PKCS #7 file." You can either browse for the file to insert or open c:\certreq.txt in notepad, select the text, copy and paste it into the block provided. and then submit.
Go back into Certificate Authority from the Adminstrative tools menu. Expand root CA and then pending requests. Select the right-click the certificate on the right and click all tasks - and then issue. Close the CA. Go back into internet explorer and back to http://caservername/certsrv/
Click View the status of a pending certificate request. and then saved request (and the date).
Click download the certificate. select the same location as your certificate request.
Go back into IIS management. Right-click default web site and click properties. Select the Directory Security tab and then click server certificate. Click next. and then ensure process the pending request and install the certificate is selected and click next. click browse and locate the certnew.cer file you saved earlier. Click next and accept port 443, click next twice and then finish. Close IIS Management. Well done, you now have a web server certificate all installed and ready to go.




 Posts
Posts

