Tuesday, April 29, 2008

Mail delivery limits and settings

Mail delivery settings in Exchange 2007 are not as easy to find as in Exchange 2003.
The first settings we will look at, is the Size settings for inbound and outbound smtp traffic.

To see what your current configuration is, open Exchange Management Shell, and type
Get-TransportConfig or (get-tran tab tab tab )* (* tab is auto-complete in powershell)

These are the default settings. To configure Maximum outgoing message size, we use the -MaxSendSize switch. Microsoft has been kind enough to allow us to specify the units we are working with, ie: kb, mb, gb or tb. Kilobytes is assumed if no unit is specified. So we could change the outbound message size to a 10Mb limit by typing: Set-TransportConfig -MaxSendSize 10mb

We could then also specify maximum receiveable size at 10mb too.

Set-TransportConfig -MaxReceiveSize 10mb

now, if we Get-TransportConfig


Incidently, you can override these settings on a per-mailbox basis.

Get-Mailbox Select-Object MaxSendSize, MaxReceiveSize
will return the current setting. If you wish to change it use:
Set-Mailbox -MaxSendSize 5mb -MaxReceiveSize 5mb

The last thing i would like to mention is the outbound mail connections.
Many companies use external mail filtering solutions. This means that all inbound and outbound mail is passed through a smart host for processing and delivery. Exchange 2007 does not assume this to be the case straight off. In Exchange Management Console, We need to make a change to the maximum outbound connections per domain. To make this change, expand Server Configuration on the left, select the Hub Transport Server that is reponsible for delivering to the smart host. Click Properties in the Action Pain on the Right. Navigate to the limits tab.
At the bottom, there is the setting. Change the maximum outbound connections per domain to 1000. This will ensure Exchange is able to open as many threads to the smart host as possible.


Limits all set, your mail should be flying in and out.


Friday, April 25, 2008

RPC over https Part 2

Configuring exchange.

The next step is to configure exchange virtual directories. This assumes that you are running all the roles on one server. So you've installed Client Access, Hub Transport and Mailbox Role to a single server.

Start by opening Exchange management shell.


Now we get started with some almost difficult command-line stuff. If you started out with ms-dos you should feel quite at home. First we need to set the web services virtual directory internal and external url's. Type Get-WebServicesVirtualDirectory and press enter.
(tip: if you type get-web and press Tab, it will auto-complete for you.)
Click the top-left corner of the shell box, hover your mouse over edit and click mark.
Create a block by selecting all the text and then press enter. Open notepad and paste the text.
Edit the Internalurl to reflect the common name you registered in the certificate. Select this url and click edit and then copy.
Go back to the shell. type:

Set-ClientAccessServer -AutoDiscoverInternalUri 'https://thenameonyourcert/autodiscover/autodiscover.xml'


Set-WebServicesVirtualDirectory -InternalUrl 'https://thenameonyourcert/EWS/Exchange.asmx' -Identity 'servername\EWS (Default Web Site)'

Next we set the Outlook Address Book internal url:
Set-OabVirtualDirectory -InternalUrl 'http://thenameonyourcert/OAB'

Next we set the Outlook Web Access internal url:
Set-OabVirtualDirectory -InternalUrl 'http://thenameonyourcert/OAB'

and finally we set the autodiscover url:
Set-AutodiscoverVirtualDirectory -InternalUrl https://thenameonyourcert/Autodiscover/Autodiscover.xml -Identity 'servername\Autodiscover (Default Web Site)'

Ok, certificates all done. Now open Exchange Management Console. and enable Outlook anywhere.

You will be prompted for the external address. You need to specify the name on your certificate.
Once successfully installed. Your Outlook Anywhere or RPC over HTTPS is configured and ready to use.


Thursday, April 24, 2008

RPC over https Part 1

Outlook Web Access and Outlook Anywhere configuration in Exchange 2007 is an interesting procedure. Here are the steps to configure them using an internal root certificate authority.


First install a Stand-Alone root certificate authority, that is, if you don't already have one in your organisation.

Go to Add/Remove Programs in Control Panel. Select "Add/Remove Windows Components".


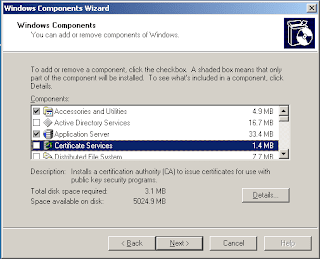
Select Certificate Services, and click Details. Click in the Select box for Certificate Services CA, you will be shown a dialog box warning that you will not be able to change the name of the server once you install the certificate services. Click Yes and then OK. Click Next. Choose Stand-Alone Root CA and click next. Enter the name of your CA. You can call it whatever you like really. Click Next. Verify the path of the certificate database and log and click next.

You will get a dialog box warning that IIS will be stopped temporarily. Click Yes. Windows will then copy some files, so make sure you have you Windows Server 2003 Disk 1. You may be warned that ASP needs to be enabled on IIS, choose Yes. Click Finish when it's all done.

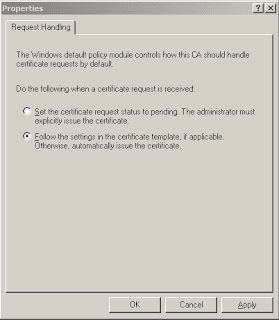
Next we can get CA Services to automatically issue the certificates on request. In administrative tools, Select Certificate Authority. Right-click "Certificate authority (local)" and click properties. On the Policy Module tab select Properties and choose "follow the settings in the certificate template, if applicable. Otherwise, automatically issue the certificate." and click ok. The certificate services will restart. Close the Certificate Authority.


Ok, CA installed. NExt step is to request a certificate.

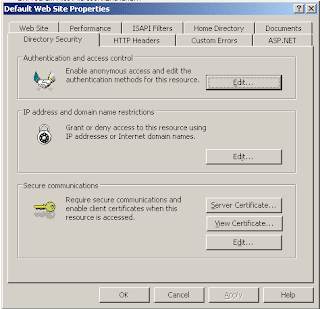
Open Internet Information Services Manager from Administrative Tools. Expand your server name and websites. Right-click "Default Web Site" and click properties. On the Directory Security tab, click Server Certificate.


Click Next, select Remove the Current certificate and click next twice and then finish. Click Server Certificate again. Click next. Choose Create a new certificate and click next. Choose Prepare the request now, but send later. Click Next. Accept the Default name and bit length and click next. Enter you organisation information and click next. Now the next step is very very important. Here you enter the common name. This is the name you will enter into your browser to connect to you outlook web access. This name should be a public name. I'm using webmail.rndorg.net - If you get this wrong, your certificate will be useless and you will have to start again. So enter the name and click next. Choose your country, state/province and city/locality and click next. Accept the default name and path and click next twice and then finish.

Now we need to submit the request to the Root CA. To do this we go into internet explorer. and navigate to http://caservername/certsrv

Click Request a certificate. and then advanced certificate request. Choose the second option, "Submit a certificate request by using .... PKCS #7 file." You can either browse for the file to insert or open c:\certreq.txt in notepad, select the text, copy and paste it into the block provided. and then submit.

Go back into Certificate Authority from the Adminstrative tools menu. Expand root CA and then pending requests. Select the right-click the certificate on the right and click all tasks - and then issue. Close the CA. Go back into internet explorer and back to http://caservername/certsrv/

Click View the status of a pending certificate request. and then saved request (and the date).

Click download the certificate. select the same location as your certificate request.

Go back into IIS management. Right-click default web site and click properties. Select the Directory Security tab and then click server certificate. Click next. and then ensure process the pending request and install the certificate is selected and click next. click browse and locate the certnew.cer file you saved earlier. Click next and accept port 443, click next twice and then finish. Close IIS Management. Well done, you now have a web server certificate all installed and ready to go.


Tuesday, April 22, 2008

Domain Functional Level Error

One of the requirements for Exchange 2007 is a Domain Functional Level of "Windows Server 2003" mode or higher. The default installation of Windows Server 2003 R2 having been promoted to a domain controller using dcpromo is not in the required mode. This is the error you will get when trying to install before raising the functional level of the domain.To fix this, open Active Directory Domains and Trusts, which is located in Administrative Tools.
Right-Click on the domain name and select "Raise Domain Functional Level" Select Windows Server 2003 from the drop down and then click "Raise".


Once this is done, (it takes only a few seconds). Switch back to your installation and select "Retry".

Provided you have not got any more missing pre-requisites, the installation should go ahead.

Thursday, April 3, 2008

Outlook 2007 password prompt

Outlook 2007 uses https to collect free/busy and address book information from the Client Access Server (CAS).

If you have a proxy enabled in internet explorer, Outlook uses this connection setting for all http and https traffic. To fix the problem, go to internet explorer, select 'tools' and then 'internet options', navigate to the 'connections' tab. Click the 'Lan Settings' button. Select advanced.


Under 'Exceptions' enter the IP address of the Exchange CAS Server.


440 Login Timeout

When you try to log on to Microsoft Exchange Server 2007 by using Microsoft Office Outlook Web Access, you receive the following error message: 440 Login Timeout.

This is an IIS authentication issue. To repair it, do the following from the exchange management shell:


Remove-OwaVirtualDirectory "exchange (default web site)"
Remove-OwaVirtualDirectory "public (default web site)"
Remove-OwaVirtualDirectory "exchweb (default web site)"
Remove-OwaVirtualDirectory "owa (default web site)"

To re-create the Outlook Web virtual directories, type the following commands

New-OwaVirtualDirectory "exchange" -OwaVersion Exchange2003or2000 -VirtualDirectoryType Mailboxes -WebSiteName "Default Web Site"

New-OwaVirtualDirectory "public" -OwaVersion Exchange2003or2000 -VirtualDirectoryType PublicFolders -WebSiteName "Default Web Site"

New-OwaVirtualDirectory "exchweb" -OwaVersion Exchange2003or2000 -VirtualDirectoryType Exchweb -WebSiteName "Default Web Site"

New-OwaVirtualDirectory -name "owa" -OwaVersion Exchange2007 -WebSiteName "Default Web Site"

Test OWA.

It is also possible to remove and re-install the CAS role from the control panel.